Simple BlockChain - Kotlin
The goal if this post is to build a very simple blockchain for maintaining a transaction history of some chunk of data.
In this project we will create a small service to:
- View all blocks in our blockchain
- Append new blocks to our blockchain
- Validate the blockchain
The project is maintained on GitHub: here.
Technologies Used
Kotlin + Ktor
BlockChain Structure
You can think of the blockchain as a list of blocks. Each node is "linked" to a previous node based on a block knowing the previous node's hash.
Visually it's fairly straightforward to understand:
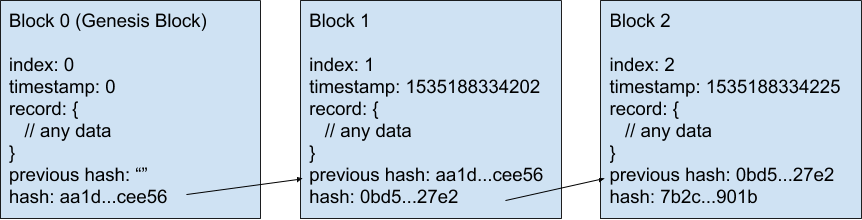
The Block
Our first step is to decide what to store in our Blocks. Given that currently I'm on a diet and tracking my weight daily I decided to go with that.
Kotlin's data class makes this very trivial.
data class Record(val weight: Double, val date: Long)
Next we want to embed our data into a Block. We can create a simple class based on our above image.
class Block(
        val index: Int,
        val timestamp: Long,
        val record: Record,
        val previousHash: String) {

    val hash: String = hash(this) // TODO define the hash function
}
Each Block contains a unique hash based on the contents of that block.
To compute this we must define a function to concatenate all our data fields and sha256 it.
We can add a companion object to our Block class containing the hashing logic.
You do not have to use sha256, and can chose whatever hashing function fits your use-case.
class Block(
        val index: Int,
        val timestamp: Long,
        val record: Record,
        val previousHash: String) {

    val hash: String = hash(this)

    // creating a companion object is similar to Java's `static` keyword.
    companion object {
        private fun hash(block: Block) = DigestUtils.sha256Hex(
                block.index.toString() +
                        block.timestamp.toString() +
                        block.record.hashCode() +
                        block.previousHash)!!
    }
}
Note that the previous hash is also included in the current hash.
This enforces the blocks are linked together via their hashes.
The BlockChain
Our blockchain is ultimately just a list of blocks, but we are still going to bundle it all together in a class so that we can later decorate it with more features.
Our first iteration will contain a list of blocks, and functionality to generate the first Genesis Block.
class BlockChain(private val chain: MutableList<Block> = initializeWithGenesisBlock()) {

    // some other helpful public functions
    fun length() = chain.size
    fun last() = chain.last()
    fun get(i: Int) = chain[i]
    fun getChain() = chain

    // ... more functions to come

    companion object {
        private fun initializeWithGenesisBlock() =
                mutableListOf(Block(
                        index = 0,
                        timestamp = 0,
                        record = Record(weight = 0.0, date = 0L),
                        previousHash = ""
                ))
    }
}
Next we want to be able to add a new block to our blockchain.
To do so we can add an add function to the BlockChain class.
fun add(record: Record) {
    // wrap our data in a Block
    val block = generate(last(), record)

    // validate the new block we are about to add is consistent with the previous block
    if (!isValid(block, last())) {
        throw RuntimeException("Invalid Block!")
    }
    // finally add the new block
    chain.add(block)

    // for extra validation, re-validate the entire chain
    if (!isValid()) {
        throw RuntimeException("Invalid BlockChain!")
    }
}

private fun generate(block: Block, record: Record): Block {
    return Block(
            index = block.index + 1,
            timestamp = System.currentTimeMillis(),
            record = record,
            previousHash = block.hash)
}
The isValid checks provide two primary functions:
- Validate a single new block is consistent with the previous block.
- Perform the above check on each block starting from the genesis block.
We will add the functions to the BlockChain class.
private fun isValid(): Boolean {
    // a blockchain only containing the genesis block is valid by definition
    if (length() == 1) { return true }

    // assert full history is valid
    for (i in (0 until length() - 1)) {
        if (!isValid(get(i + 1), get(i))) {
            return false
        }
    }
    return true
}

private fun isValid(newBlock: Block, oldBlock: Block): Boolean {
    // assert indices are sequential
    if (oldBlock.index + 1 != newBlock.index) { return false }
    // assert hashes are linked correctly
    if (oldBlock.hash != newBlock.previousHash) { return false }
    // assert the hashes themselves are correct.
    // this check is important to ensure our data within the block wasn't altered
    if (hash(newBlock) != newBlock.hash) { return false }

    return true
}
That's really all there is to our simple blockchain implementation!
Wrap in Web Service
Currently we have a very boring blockchain that we can't even interact with. Lets change that by putting it behind a web service so we can interact with it.
I decided to try Ktor as I've never actually used it and typically use Spring Web for everything.
I found the learning curve to be very light, and with coroutines enabled the resulting code was very simple, concise, and fast.
fun main(args: Array<String>) {
    BlockChainViewServer().start()
}

class BlockChainViewServer {
    private val blockChain = BlockChain()

    fun start() {
        embeddedServer(Jetty, 8080) {
            install(CallLogging)
            install(ContentNegotiation) {
                jackson {
                    enable(SerializationFeature.INDENT_OUTPUT)
                    propertyNamingStrategy = PropertyNamingStrategy.SNAKE_CASE
                }
            }
            routing {
                get("/") {
                    println(blockChain)
                    call.respond(blockChain)
                }
                post("/") {
                    val record = call.receive<Record>()
                    blockChain.add(record)

                    println(blockChain)
                    call.respond(blockChain)
                }
            }
        }.start(wait = true)
    }
}
Now that we have a web service, simply run BlockChainViewServer and we can immediately begin interacting with our blockchain.
View Default BlockChain
curl -XGET localhost:8080
{
  "chain" : [ {
    "index" : 0,
    "timestamp" : 0,
    "record" : {
      "weight" : 0.0,
      "date" : 0
    },
    "previous_hash" : "",
    "hash" : "2ac9a6746aca543af8dff39894cfe8173afba21eb01c6fae33d52947222855ef"
  } ]
}
Add Record to BlockChain
curl -XPOST --data '{"weight":190.0, "date":1535015447}' -H 'Content-Type: application/json' localhost:8080
curl -XPOST --data '{"weight":188.0, "date":1535101847}' -H 'Content-Type: application/json' localhost:8080
curl -XPOST --data '{"weight":185.0, "date":1535188248}' -H 'Content-Type: application/json' localhost:8080
Viewing the BlockChain again will now result in four entries. The genesis block + three entries.
curl -XGET localhost:8080
{
  "chain" : [ {
    "index" : 0,
    "timestamp" : 0,
    "record" : {
      "weight" : 0.0,
      "date" : 0
    },
    "previous_hash" : "",
    "hash" : "2ac9a6746aca543af8dff39894cfe8173afba21eb01c6fae33d52947222855ef"
  }, {
    "index" : 1,
    "timestamp" : 1535232343698,
    "record" : {
      "weight" : 190.0,
      "date" : 1535015447
    },
    "previous_hash" : "2ac9a6746aca543af8dff39894cfe8173afba21eb01c6fae33d52947222855ef",
    "hash" : "ecd6d0758d83c595aef3c29ed9c76453537e2710f12ff960581d4fd775ff8ffd"
  }, {
    "index" : 2,
    "timestamp" : 1535232343723,
    "record" : {
      "weight" : 188.0,
      "date" : 1535101847
    },
    "previous_hash" : "ecd6d0758d83c595aef3c29ed9c76453537e2710f12ff960581d4fd775ff8ffd",
    "hash" : "0ee658c050e185a807781173492052a391cd7f659873b11d8ba360b2cd05c6dc"
  }, {
    "index" : 3,
    "timestamp" : 1535232343746,
    "record" : {
      "weight" : 185.0,
      "date" : 1535188248
    },
    "previous_hash" : "0ee658c050e185a807781173492052a391cd7f659873b11d8ba360b2cd05c6dc",
    "hash" : "3d29a963baa917af7367f28dc68fa030feacb28177cc69512ca97f0ac2ecae58"
  } ]
}
Conclusion
This implementation does not handle any networking or conflict resolution that arises in decentralized networks. This post is only to show how transactions are started in blockchain technologies.
In my next post I will develop a simple decentralized blockchain that computes integer factorization and generated blocks.
 Arrived
 Ninja Turdle
 Twitch